In the early morning hours of June 22, 2024, my sister, brother-in-law, their 4 kids, and small dog were rescued from rising flood waters in their Rock Valley, IA home. Along with many of their friends, co-workers and neighbors, they lost their vehicles, many possessions and the entire basement and main floor of their home. We are grateful for the many volunteers who helped to clean out, gut, and clean what is left of their home as they await future decisions regarding rebuilding.
As we’ve had people reach out asking how they can help replace items lost, we have asked them to put together an Amazon wish list. Currently living with family members, these items will help with their temporary housing situation and give the kids a few things to play with as all of their toys had to be thrown out. Lists may be updated in the future. If you would like to purchase anything from the list, please ship to:
Rock Valley Community School (K-12) where they both teach and kids attend was also flooded and they lost many classroom materials that were personally furnished by the teachers. This wish list is for all teachers, but if you want to find things for them specifically, look for the notes for “A Vander Maten” or “W Vander Maten” or “4th Grade”. We’d love to help these teachers and kids with what they lost!
If you’re looking for a unique and heartfelt gift for your mother, consider giving her a Storyworth subscription. Storyworth is a platform that helps preserve family memories by capturing stories and conversations with loved ones.
Last Christmas, I gifted my parents a Storyworth subscription and it’s the best thing I’ve done…for myself. 🙂 Each week they received a question by email and they simply responded to the prompt with a memory, story, or thought. At the end of the year, you receive a hardcover copy of the book (and can order more).
I LOVED receiving new stories each week and will cherish these books forever. I learned so many things I never knew about my mom and dad and the rich history of their lives.
Here’s how you can gift your mom a Storyworth subscription:
Visit the Storyworth website: Start by visiting the Storyworth website and selecting the “Gifts” option from the top menu. You’ll be directed to the Storyworth gift page, where you can choose the subscription plan that works best for you and your mother.
Choose the subscription plan: Storyworth offers several subscription plans, ranging from one month to a full year. You can choose the plan that fits your budget and the length of time you’d like your mother to receive Storyworth prompts.
Personalize the gift: Next, you’ll have the opportunity to personalize the gift by writing a message to your mother and selecting a gift card design. You can also choose the delivery date of the gift.
Enter your payment details: Enter your payment details, including your name, email address, and billing information.
Gift the subscription: Once you’ve completed the payment process, your gift subscription will be sent to your mother via email on the date you selected. She’ll receive a welcome message with instructions on how to activate her subscription and begin the storytelling process.
Encourage your mother to participate: Encourage your mother to participate in the Storyworth process by responding to the weekly prompts she receives via email. Storyworth prompts are thought-provoking questions that help spark memories and stories from the past.
Collect and share the stories: As your mother responds to the prompts, Storyworth will collect and compile her stories into a beautifully designed hardcover book. You can also choose to receive weekly updates on your mother’s responses and share the stories with other family members.
Gifting your mom a Storyworth subscription is a thoughtful and unique way to capture and preserve family memories. It’s a gift that keeps on giving, and your mother will appreciate the opportunity to share her stories and memories with you and future generations.
ASK your mom first if she’s willing and able to answer. It’s a way for them to leave a legacy., but you don’t want it to be a burden.
OFFER to help edit, add pictures, make final purchase so the only thing they have to worry about is writing.
CUSTOMIZE the questions to make sure thing pertaining to their life are covered.
*Disclosure: This is a referral link, so you’ll receive $10 off and I’ll receive a book credit so I can order additional copies of the books for my siblings and kids. $10 off is the best deal they offer and I appreciate you using my link!
Other Mother’s Day Gift Ideas
Mother’s Day is a special occasion to celebrate and honor the mothers in our lives. It’s a time to show our appreciation and love for all that they do for us. If you’re looking for Mother’s Day gift ideas, a Storyworth subscription is just one option to consider.
Other Mother’s Day gift ideas include personalized gifts such as custom jewelry or a monogrammed robe, relaxation gifts like a spa day or a massage, and sentimental gifts such as a photo album or a family tree.
You can also consider practical gifts that your mother will use and appreciate, such as a new kitchen appliance or a fitness tracker. Subscription boxes tailored to your mother’s interests, like beauty or food, are also a great option.
If you’re on a budget, handmade gifts like a DIY flower arrangement or a homemade candle can be a thoughtful and meaningful gesture. And don’t forget the power of a heartfelt card or letter expressing your love and gratitude for all that your mother has done for you.
Providing a meal and a space to gather or a pot of flowers is one of my favorite ways to celebrate Mother’s Day.
No matter what gift you choose, remember that the most important thing is to show your mother that you care and appreciate her. Take the time to find a gift that truly reflects her interests and personality, and she will surely cherish it for years to come.
Sounds too good to be true, right? It truly can be this simple if you follow the easy steps listed below.
Why should you listen to me?
I have 7+ years of experience in “credit card hacking” which simply means I take advantage of bonus sign-ups and maximize my rewards by using the “right” card for the “right” purchase at the “right” time. I’ve earned thousands of dollars of rewards in that time, but I realize most people don’t want to put in the time and energy to track everything I do to make my system work. I often have people ask how they can get started with earning credit card rewards, so instead of making it super-complicated, I’m going to lay out the most SIMPLE one available right now that has no fees.
If you are not taking advantage of credit card rewards at all or don’t like the limitations on redeeming on your current card, this is an EASY way to start.
If you spend $500/month on groceries, you can earn $500 in the next 12 months.
Steps to Follow
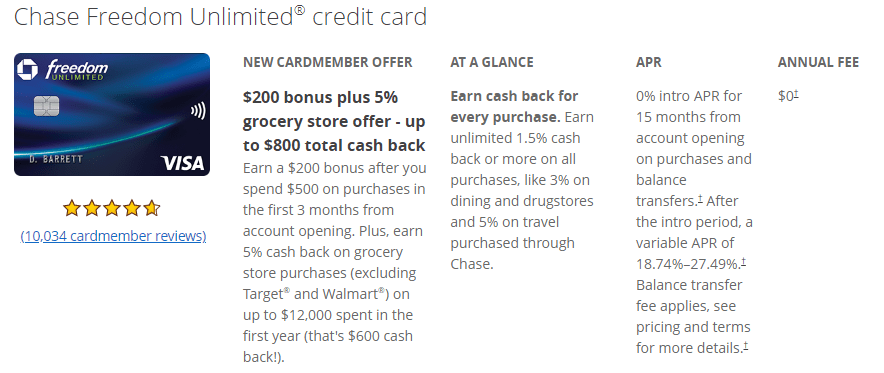
First, apply for the Chase Freedom Unlimited Card which is offering a $200 bonus when you spend $500 (on anything) in the first 3 months and 5% cash back on groceries for the first 12 months. There is NO annual fee!
Once you get your card (mine took less than a week to arrive), use that card for ALL purchases at your grocery store (Target and Walmart don’t count…Fareway, Hy-Vee, H-Vee Dollar Fresh, Aldi, Kroger, etc. do). You can use it for other purchases too to earn even more cash.
PAY OFF YOUR CARD in full every month before the due date. Don’t charge anything you don’t have money for IN YOUR ACCOUNT. If you have had trouble in the past, try paying your card online every time you make a purchase to make sure you stay on track. I use auto-pay so I never miss a deadline.
Rewards are posted to your account. Redeem for CASH either as a deposit in your checking account or as a statement credit. They don’t expire! You can get better bang for your buck using them for travel, but I think that’s where people get confused, so for my purposes here, I’m just assuming you straight-up cash out.
That’s all!
The link shows you 2 different cards with very similar benefit- the Chase Freedom Unlimited card and the new Chase Freedom Flex card. Either one will get you that $500+, but see below for my recommendation.
When you spend $500 in the first 3 months, you get a $200 cash-back bonus.
When you spend $500/month for 12 months at grocery stores, get 5% back ($25/month) or $300 in a year.
That’s $500 in 1 year just for buying your usual groceries!
How to earn even more cash:
The 5% back on groceries works on up to $12,000 in grocery purchases in the first year, so if you buy $1000 of groceries/month instead of $500, you could earn $600 instead of $300
Get 3% cash back on dining purchases and 2% on drugstores
The Freedom Flex (Mastercard) gives you 1% on all other purchase, Freedom Unlimited (Visa) gives you 1.5% on all other purchases, so start with Freedom Unlimited if you don’t have that card.
What could prevent you from getting this deal?
You are not guaranteed to be approved for the credit card if your credit score is too low, your credit report shows you delinquent on payments, or you’ve opened too many cards lately (Chase unofficially has a rule that you can’t open more than 5 cards in 24 months). You also can’t currently have the SAME exact card already open (unless you put it in your spouse’s name)
Applying for a card WILL trigger a hard pull on your credit which is only a big deal if you have mediocre credit and need to apply for a major loan (mortgage, car, etc.) in the near future.
You SHOULD NOT do this deal if you can’t trust yourself to pay your card on time or feel you will overspend if using a credit card vs. cash, etc. I ONLY recommend this deal to people planning on simply converting their REGULAR spending to this card to take advantage of the better rewards.
Using my link and getting approved for the card may result in me receiving a referral bonus. You are free to search for the deal on your own, but if you found this information helpful, I appreciate you using my link. I am also willing to help with any questions you have along the way! You can find me on my facebook page: https://www.facebook.com/WorkingMomHacks/
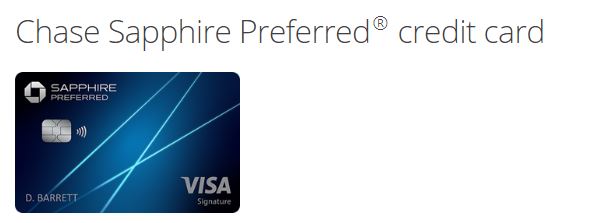
If you have $4000 in expenses in the next 3 months, here’s a way to earn $545 minimum in cash.
Why should you listen to me?
I have 7+ years of experience in “credit card hacking” which simply means I take advantage of bonus sign-ups and maximize my rewards by using the “right” card for the “right” purchase at the “right” time. I’ve earned thousands of dollars of rewards in that time ($2500+ in 6 months), but I realize most people don’t want to put in the time and energy to track everything I do to make my system work. I often have people ask how they can get started with earning credit card rewards, so here is THE ONE to do. It’s the best sign-up bonus currently available and I will make it as SIMPLE as possible for you.
If you are not taking advantage of credit card rewards at all or don’t like the limitations on redeeming on your current card, this gets you the most bang for your buck without being overly complicated.
Once you get your card (mine took less than a week to arrive), use that card to pay for your everyday purchases to reach $4000 in total spend in 3 months from your approval date. Here are some ideas for spend:
Groceries, Gas, Clothes, Household expenses, Car Repairs (we bought appliances)
Streaming services, subscriptions for the next 3 months
Auto Insurance (6 month premium knocks out some good spend)
Property Taxes if you’re not under escrow (2.25% fee in my county, but you’ll get 1% of that back, so it’s a small fee to knock out a big chunk of your spending)
NOTE: The $95 annual fee IS charged right away and does NOT count as part of the $4000 spend. You can cancel the card after you get the bonus and before your annual fee posts next year if you want.
PAY OFF YOUR CARD in full every month before the due date. Don’t charge anything you don’t have money for IN YOUR ACCOUNT. If you have had trouble in the past, try paying your card online every time you make a purchase to make sure you stay on track. I use auto-pay so I never miss a deadline.
Your 60,000 bonus points will post to your account on the statement after you reach $4000 in spend. Redeem for CASH either as a deposit in your checking account or as a statement credit. You can get better bang for your buck using them for travel or one of the temporary “Pay Yourself Back” categories, but I think that’s where people get confused, so for my purposes here, I’m just assuming you straight-up cash out.
When you spend $4000 in the first 3 months, you get 64,000 points (60,000 sign up + 1 per $ spent minimum)
If you redeem this for cash, it’s worth $640!!
Subtract the $95 fee and you’ll net $545 minimum. That’s 13.6% of your spend back in cash.
If you redeem for travel instead of cash, the 64,000 points would be worth $800, so after the $95 fee it’s a $705 net + $50 hotel credit = $755 in value.
How to earn even more cash:
Earn up to $50 in statement credits each account anniversary year for hotel stays purchased through Chase Ultimate Rewards® and Earn 5x total points on travel purchased through Chase Ultimate Rewards® portal.
I have done this and the hotel credit works. Besides this credit I don’t actually recommend booking through the portal–booking through a 3rd party is always a risk that something won’t go right on your reservation and you’ll get the run around.
Earn 2x on other travel purchases. (Although I don’t use the portal, I DO recommend putting direct travel purchases on this credit card because it has excellent travel/delay/luggage/rental car coverage.
Earn 3x points on dining, including eligible delivery services, takeout and dining out
Earn 3x points on ONLINE grocery purchases (excluding Target, Walmart and wholesale clubs).
Earn 3x points on select streaming services.
Plus, earn 1 point per dollar spent on all other purchases.
What could prevent you from getting this deal?
You are not guaranteed to be approved for the credit card if your credit score is too low, your credit report shows you delinquent on payments, or you’ve opened too many cards lately (Chase will deny you if you’ve opened 5 credit cards in the past 24 months). You also can’t have received a bonus for a Sapphire card in the past 48 months and can’t currently have an open Sapphire Preferred or Sapphire Reserved Card.
Applying for a card WILL trigger a hard pull on your credit which is only a big deal if you have mediocre credit and need to apply for a major loan (mortgage, car, etc.) in the near future.
You SHOULD NOT do this deal if you can’t trust yourself to pay your card on time or feel you will overspend if using a credit card vs. cash, etc. I ONLY recommend this deal to people planning on simply converting their REGULAR spending to this card to take advantage of the better rewards.
Using my link and getting approved for the card may result in me receiving a referral bonus. You are free to search for the deal on your own, but if you found this information helpful, I appreciate you using my link. I am also willing to help with any questions you have along the way! You can find me on my facebook page: https://www.facebook.com/WorkingMomHacks/
You can CANCEL this card before the next annual fee hits so you don’t pay the $95 each year but I have held onto this card for the travel protections and the increase in Chase Ultimate Rewards values it provides.
In August, 2021, our family of 5 (mom, dad, 11yo boy, 8yo boy, 6yo girl) took a week-long trip to Branson, MO and had a great family summer vacation. To highlight the trip and help other families build an itinerary, here are some details of the trip.
Day 1- Saturday: Drive and Bass Pro Shops
Left NW Iowa at 8am and ate a picnic lunch in the van on the way. It was 93 degrees and the van had some trouble with A/C which we know know could have been avoided if we’d known to use the “recycle air” button next to the A/C to keep the cool air in the van instead of pulling in hot air to cool.
Bass Pro Shops, Springfield
We stopped at Bass Pro Shops in Springfield, MO from 4:00-5:30pm which was pretty cool- they have a HUGE moose statue and lots of taxidermy animals on display, turtles, and a whole section that seems like you’re at the bottom of a lake. Worth a stop. We did not got to the Wonders of Life aquarium next door as it seemed pretty expensive, and did not stop at Lambert’s Cafe (home of throwed rolls) on this trip just because we didn’t come through during a meal time.
We drove on to Branson and checked into our AirBnB at Notch Estates. This is listed as “Silver Dollar Refuge” in Reeds Spring, MO and that was a perfect description! It was a terrific spot for our family–very spacious. 3 beds in the kids room so they each had their own, room for 5 at the dining table (things I looked long and hard for) and a perfect quiet location that was near Walmart (I did a big grocery run the night we arrived) and very close to Silver Dollar City. It had a small catch and release pond (too hot while we were there) and 2 pools with nice deck and shade. Highly recommmend! Day 2 – Sunday – Silver Dollar City/Marvel Cave
Powder Keg (my one and only time. Kids did several times!)
We opted to buy a 3-day 2-park pass directly from Silver Dollar City and feel like we definitely got our money’s worth. We arrived at SDC before opening so we could watch the tribute to Veteran’s and then hit the popular rides in the morning: Fire in the Hold, PowderKeg, American Plunge, Swings, watched the Harlem Globetrotter’s show in A/C, Flooded Mine. Went back to the condo for lunch and to cool off. Came back and waited in line for the Marvel Cave tour (you do need to get in line early!). The cave was awesome! A huge cavern that they once flew 3 hot air balloons in! After the cave we did Thunderation, played at Fireman’s Landing, ate supper in the park then listened to the Eastern Heights concert, watching fireworks from Echo Hollow until 9:30pm.
Day 3 – Monday – Buffalo River in AR
Floating down the Buffalo River
After a big breakfast, we drove 2 hours to the Buffalo River past Yellville, AR. Very windy roads!! The outfitters we used were a little rough around the edges but there were several other options. We really had a great day slowly floating down the river, stopping to explore caves and rock formations. Highly recommend water shoes because it is rocky! Stayed at the beach where our van was parked, then drove back with a stop at Sonic in Yellville. Swam in the pool that night. If you get a chance to float the Buffalo River, do it!
Day 4 – Tuesday – White Water Water Park / Pizza Ranch / Sights & Sounds Theater
As part of our 3-day pass, we could visit the White Water Water park. Had a fun time–kids liked the wave pool the best. The lazy river kept closing and some of the slide lines were long.
We were ready to go by 3pm and we headed to the Pizza Ranch Buffet & FunZone Arcade since it has buffet all day and Tuesday you can get a free Kid’s Buffet with each Adult’s buffet. Great food and had fun playing in the arcade.
While there, we made a last-minute decision to buy tickets to the Jesus show at the Sights & Sounds theater. The show was amazing with a great cast, incredible set and even live animals. Highly recommend going to see whatever they are showing!
Day 5 – Wednesday – Hatchery / Ballparks of America / Branson Belle
Public Fishing near Fish Hatchery/DamFish Hatchery
We visited the Shepherd of the Hills Fish Hatchery and checked out the public fishing spot nearby (didn’t fish, but fun to skip rocks). Tip: bring quarters AND A SOLO CUP for fish food so you don’t have to hold it in your hands! It is also closed Sun & Mon! The hatchery was okay (nothing like Spearfish) but I think a few things were closed due to high covid cases at the time.
Ballparks of America
My husband and oldest son then caught a Little League game at Ballparks of America (right by White Water Water park) while the rest of us swam.
Then we all dressed up for dinner and a show on the Branson Belle. The boat never actually left the dock due to high winds, but it was still fun. Food wasn’t as good as I’d remembered, but a fun experience and the mentalist (Christopher James) was fascinating. We had seen a deal where you could call to add Branson Belle tickets to your Silver Dollar City tickets, so check if that deal is available.
Day 6 – Thursday – Silver Dollar City
Fireman’s Landing at Silver Dollar City
Since we’d been here before, we now knew what rides we really wanted to do again. This time we did Mystic River Falls (go at park open for shorter lines), Fire in the Hole, PowderKeg, Tom & Huck Water Blast, American Plunge and the Frisco Train. Then home for lunch and to change into dry clothes (we did all water rides in the morning and it was hot enough we didn’t mind being wet, but changing was a good idea). In the afternoon we saw Sadie’s Wild West River, all the Grand Exposition rides (great for those middle kids who don’t love the huge thrill rides), Fireman’s Landing (they loved the ball room where you shoot from air guns and collect foam balls), PowderKeg.
We left and ate summer at home because we had tickets to Hamner’s Unbelievable Family Variety Show that night. The show was a little past-it’s-prime and the low ticket price was reflective of quality. The kids did like the aerialist and the guy on a giant ring. But our 6yo fell asleep in the front row and we were too close to the magic and could see many of the “tricks”. The singers catered to a much older crowd (Sammy Davis, Jr. impersonation??). I’d choose something different, but we were probably spoiled by the quality of the Jesus show.
We went to Copperhead Mountain Coasters first thing in the morning to avoid the lines. We each did 2 rides and really liked it. Our 11-yo’d favorite part of the trip. I had purchased BOGO tickets online in advance from bransonshows.com but you have to pick up your tickets on the strip when you arrive (got the Hamner’s tix there too). It was one of those high pressure “book all your tix” places once you walked in, but I held firm because I’d already booked all our other tickets directly for cheaper. So, do your research on best place to buy and whether it’s worth the hassle picking up on the strip.
We went down to Branson Landing and saw the fountain’s (okay, but not worth a whole trip) and walked through Bass Pro Shop. We weren’t in the mood for much other shopping and weren’t planning to eat out, so we headed home to swim.
Then we cleaned up to go to Dolly Parton’s Stampede. You get to see the horses while in line and have a full meal and show. This was very fun and our daughter even got picked to do the Chicken Chase and won a medal for the North. Hwy 76 traffic was horrible after the show so we recommend taking the backroad when you can! We actually avoided the strip at night except for this night.
Day 8 – Saturday – Drive Home
We left by 8:30am and didn’t make many interesting stops on the way home–just Culvers past Kansas City, gas in Missouri Valley, and stopped in Sioux City for FB cleats and got home after 6 in time to unpack, make supper, get groceries. Glad we had Sunday to recover because my husband started school that Monday!
Things we didn’t do:
There is so much to do in Branson, so here are some ideas of things we didn’t do on this trip:
Table Rock Lake (didn’t swim or boat like most people do)
Fritz Adventure – Ropes course, zipline, climbing, etc. We already had our itinerary planned before finding out about this place but would have loved it. I’ve known other who recommended!
Mini Golf/Bumper Boats/Go Carts – seemed to be a lot on the strip but it was so hot in August
Hiking/Waterfalls – again, so hot in August
Tourist attractions like Titanic Museum, many others on the Strip
Shopping like at Tanger Outlets, Dick’s 5 and Dime. Kids each picked 1 souvenir at SDC.
Dining out–we cooked a lot of our meals at the condo except when dinner was included with the attraction, one night at SDC, Pizza Ranch buffet (which was our lunch and supper) and the drive home. This saves us a lot of $ as a family of 5. We also brought waterbottles and snacks wherever we were allowed to.
Adding Disney+ because a year’s subscription is cheaper than one ticket to Hamilton?
(Hamilton available July 3!)
Love Disney movies, Disney TV shows, Star Wars, Pixar, and the Simpsons?
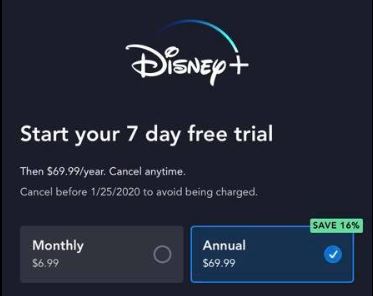
Instead of paying $6.99/month ($83.88/year) for Disney Plus, here is a way to get it for $69.99 plus $12.50$22.50- Cash Back!
Easy steps to SAVE on Disney Plus subscription streaming service:
Sign in to your Rakuten (used to be ebates) account.
If you don’t have an account, use this link to sign up and you’ll get an EXTRA $10 back when you make your first purchase of $25+ (which you’re about to do).
Search for “Disney+” on the Rakuten site and click on any of the “Shop Now” buttons to activate $12.50 cash back when you purchase an annual subscription.
Using the window that just opened (this is important!), click the link for either the hulu + ESPN + Disney+ bundle (this gets you $10 cash back) or click the link “Sign up for Disney+ Only”. Follow the instructions to enter an email and password.
On the next screen, select the Annual subscription for $69.99. (This saves you 16% over the monthly charges)
Enter your Credit Card or PayPal information to be charged when your Free Trial is over.
(EDIT: This deal is over but if you’re reading this later, check if your Chase Freedom card has any bonus categories). If you have a Chase Freedom card and are reading this Jan-March of 2020 USE THIS CARD to get 5% cash back on streaming services! Also works for Netflix, Hulu, etc. This gets you $3.50 cash back on an annual subscription to Disney+
FAQ’s
If you are already on a monthly subscription, I think you have to cancel it and then re-purchase after it expires on the Annual Subscription basis. I have not found a way to convert from monthly to Annual.
Your Rakuten Cash Back Bonus will be put in your account a few days after your purchase goes through. They pay out quarterly either in a check or directly to your PayPal.
**
For more tips on saving money, follow me on facebook.
This is my favorite baby gift or 1st birthday gift – a practical way for parents to save a few treasured keepsakes over the years without getting overwhelmed. The key, as with most organizing attempts, is to have a proper place for everything.
The main idea is to have a file folder ready for each stage in the child’s life and limiting the things kept to just what fits in the file, so you have one place to store important documents (like immunization records) but also fun stuff like drawing and writing samples, certificates, and annual school photos.
Here are step-by-step instructions on making a custom file storage keepsake box for your kids or as a gift.
Supplies:
Plastic File Box. I picked up a Sterilite Large Nesting Show-off at Walmart in the storage solutions section for about $6. (Much more expensive on Amazon.) You can order at Walmart.com but only for store pickup). I like the clamp-on lid and handle and it will work for several years. I have already replaced my 3rd grader’s with a Legal/Letter File Box, but no need to store that size until you need it.
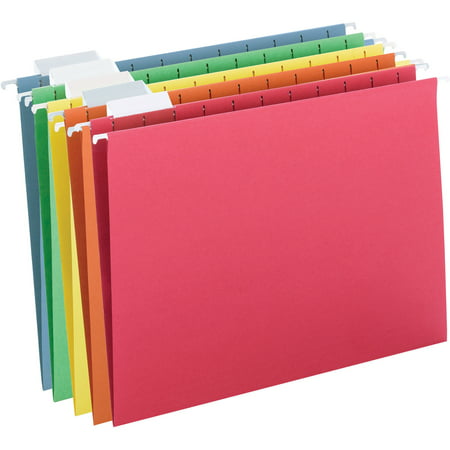
Hanging File Folders. For my project, a box of 25 is enough. You can get multi-colored file folders at Walmart or other office supply stores. I ordered the jewel-toned file folders from Amazon when I made them for my nieces.
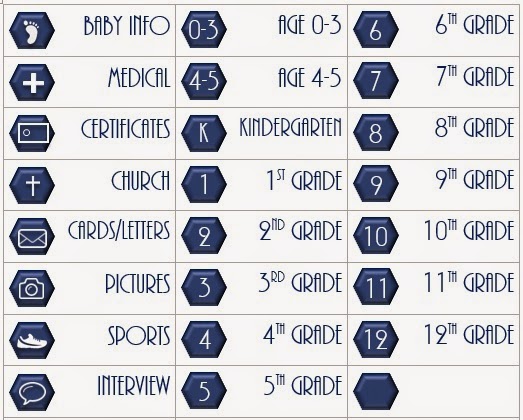
File Labels. You can certainly hand-write on the file labels that come with your folders, but I created mine on the computer, then printed them on cardstock, cut them out, and inserted them in the clear file tabs
I used a table in Microsoft Word with each row 0.6″ high and each column 2″ wide and typed in the file name. I also added a shape on the left side and put a symbol on it to correspond with each label. If you’d like to use these, just copy one of the label designs at the end of this post and paste it into a Word document, then print!
Here’s a list of the files and ideas for what to include in each one.
Baby Info: footprints and bassinet label from the hospital, birth announcements, etc.
Medical: immunization records, check-up records
Certificates: copies of birth certificate, awards they earn when they are older
Church: baptism certificate, projects they complete in church
Cards/Letters: a copy of our Christmas card/letter each year and any special cards/letters they receive that they want to keep
Pictures: professional photos/school pictures. Just a few from each year to use for graduation display, etc.
Sports: certificates, ribbons, articles as they get older
Interview: I want to do an “All About Me” interview on their birthday, so I printed 18 of this version so they are all ready to be filled out each year.
Age 0-3: artwork, projects from the early years, notes of funny things they said or did
Age 4-5: preschool report card, special art projects, CD of pictures
Kindergarten-Grade 12: report card, special projects or papers, etc. The goal is to limit it to only what FITS in the file.
Blank: I added one extra file just for anything else that might pop up as a category according to their interests, like Music, 4-H, etc.
Now, it’s just time to put all the files in the box, add all the folder labels, and fill them! I did my boxes from right to left, one space apart so I could see the symbols.
I did my niece’s left to right 2 spaces apart so you could read the whole label.
If you’re feeling really crafty, you can add a cute label to the front. I found it better to place them on the inside of the box and stick on with packing tape. Other ideas are to cut out vinyl if you have a Cricut or use paint-pen markers to just write on the front.
That’s it! For less than $20 and in just an hour or two, you can be ready to keep your kids organized for the next 18 years! This is also a much-appreciated baby gift!
It’s definitely worth putting together while your kids are young and you can modify it to fit your lifestyle. You can keep the files in a filing cabinet, add files as needed, purge things at the end of the year to keep only the most important things, etc. It’s just a system to get you started.
Be sure to PIN THIS blog post if this is something you want to come back to later!
BONUS: Save any of these label sets as an image, insert into a Word document and print! If you need to check sizes, each cell should be 2″ wide and 0.6″ tall.
One of my top money tips that involves saving time (and potentially money) is to automate your bill-pay process as much as possible.
Most credit card accounts have auto-bill pay options and even many of my bills can ACH directly out of my checking account.
Why I love these features:
If you are living in 1997 and still mail or drop off your bills, this saves you both time and money in postage and gas.
It eliminates late fees from bills that get forgotten, lost or confusion over who in the household was supposed to pay it.
It frees up mental bandwidth that was previously spent on remembering where the bills are, what is due when, what has gotten paid or not, etc.
I include some of my own savings as auto-payments each month, such as funding ROTH IRA and college investments accounts. This way they don’t get de-prioritized as other bills come in. You can also set up automatic drafts to a savings account if you’re saving money there for something special.
More tips:
Make sure your bank balance has adequate funds to cover the full statement balance on the due date. I use ynab.com to budget, so all my spending comes of categories that are funded at the time I purchase and I also follow their suggestions of building up a 1-month buffer in all categories. (Use my link to get 1 month FREE!)
Check your accounts for all the bills that come in during a month and then set up the auto-pay all at once, otherwise you’ll wonder which ones are on auto-pay and which ones you have to manually pay. Not all of them note on your statement whether auto-pay is on. Put your passwords somewhere safe.
When you set them up, they most likely will only be automatically paid on your NEXT statement, not your current statement. So, pay in full now and then next month it will pay for you. (I got caught with this on Kohl’s–it was more of a 2 month wait.)
If you have irregular bills that come up, set them up for automatic renewal if you know you want to continue use, or use your bank‘s bill-pay system to avoid using a stamp and envelope.
If you’re into credit card rewards, some bills will let you charge your card instead of drafting directly from your checking. For example, I pay my cable/internet bill on my credit card every month, then my credit card automatically pays on it’s due date. Just know that organizations are charged a fee to use credit cards, so I choose not to put my church/non-profit giving on a credit card because I don’t want them to have a to pay a transaction fee.
Ideas of Accounts to Set Up:
Church Giving
Other Mission support (example: We sponsor a child through Compassion International and set up automatic payment including birthday and Christmas presents to make sure we don’t miss it.)
Credit Cards (choice to pay last statement balance, current balance or minimum). If you’re on credit card float/not always able to pay it off every month, at least set it up to draft the minimum automatically and then just send any extra you can. But don’t get late fees to add to the mess!)
Store Credit Cards (Kohl’s, Amazon, gas card, etc.)
Mortgage (including if you want extra principle paid each month)
Daycare
Cable/Internet
Electric/Water/Garbage
Cell Phone
Investment accounts (retirement, college fund)
Subscriptions like Netflix, Amazon Prime, ID Theft protection, Computer virus protection, software, etc.
Beyond Auto-Pay:
If you do have any accounts that don’t allow auto-pay-in-full, at least figure out their online payment system so you can save stamps and trips. For example, if you doctor at a Sanford medical facility, use My Sanford Chart to pay your bills using your HSA debit card. Or at the very least, your bank may have an online bill-pay feature that will send a check for you to any business you set up.
I also recommend Paypal as an easy way to send money to friends or family for all those little things like splitting the cost of a gift or a restaurant ticket. Much easier than sending checks that someone has to cash! Just make sure you send it through “Friends and Family” and don’t send them a “request to pay” or a fee will be charged.
What other tips or ideas can you share on automating your bill-paying process?


 This is my favorite baby gift or 1st birthday gift – a practical way for parents to save a few treasured keepsakes over the years without getting overwhelmed. The key, as with most organizing attempts, is to have a proper place for everything.
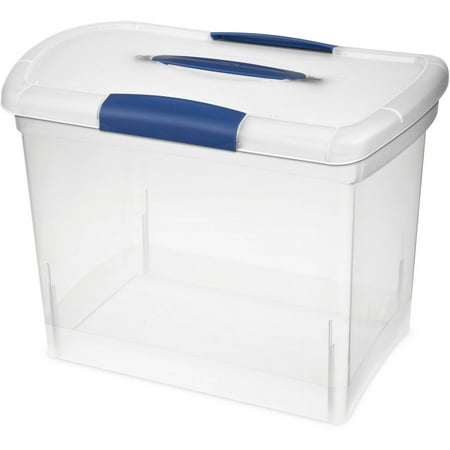
 Interview: I want to do an “All About Me” interview on their birthday, so I printed 18 of


 One of my top