 This is my favorite baby gift or 1st birthday gift – a practical way for parents to save a few treasured keepsakes over the years without getting overwhelmed. The key, as with most organizing attempts, is to have a proper place for everything.
The main idea is to have a file folder ready for each stage in the child’s life and limiting the things kept to just what fits in the file, so you have one place to store important documents (like immunization records) but also fun stuff like drawing and writing samples, certificates, and annual school photos.
Here are step-by-step instructions on making a custom file storage keepsake box for your kids or as a gift.
Supplies:
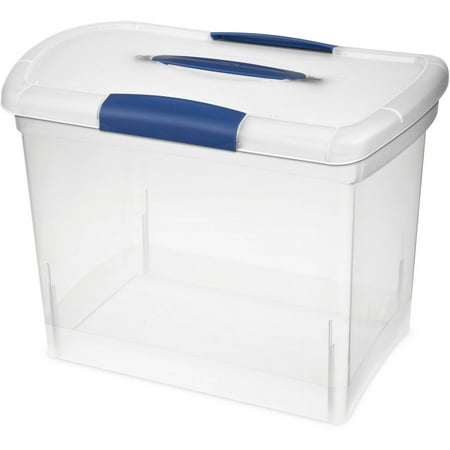
- Plastic File Box. I picked up a Sterilite Large Nesting Show-off at Walmart in the storage solutions section for about $6. (Much more expensive on Amazon.) You can order at Walmart.com but only for store pickup). I like the clamp-on lid and handle and it will work for several years. I have already replaced my 3rd grader’s with a Legal/Letter File Box, but no need to store that size until you need it.
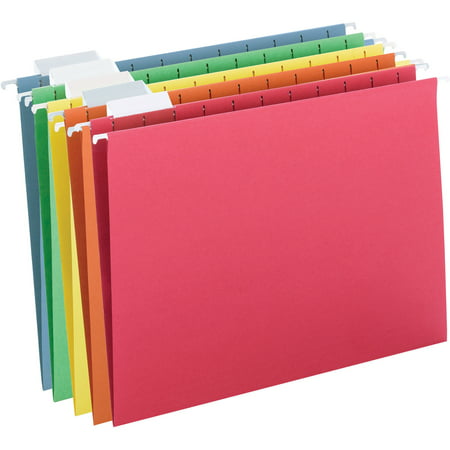
Hanging File Folders. For my project, a box of 25 is enough. You can get multi-colored file folders at Walmart or other office supply stores. I ordered the jewel-toned file folders from Amazon when I made them for my nieces.

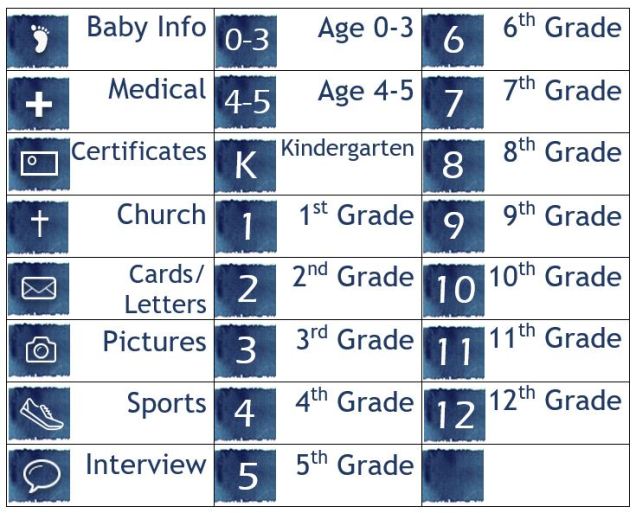
- File Labels. You can certainly hand-write on the file labels that come with your folders, but I created mine on the computer, then printed them on cardstock, cut them out, and inserted them in the clear file tabs
I used a table in Microsoft Word with each row 0.6″ high and each column 2″ wide and typed in the file name. I also added a shape on the left side and put a symbol on it to correspond with each label. If you’d like to use these, just copy one of the label designs at the end of this post and paste it into a Word document, then print!
Here’s a list of the files and ideas for what to include in each one.
- Baby Info: footprints and bassinet label from the hospital, birth announcements, etc.
- Medical: immunization records, check-up records
- Certificates: copies of birth certificate, awards they earn when they are older
- Church: baptism certificate, projects they complete in church
- Cards/Letters: a copy of our Christmas card/letter each year and any special cards/letters they receive that they want to keep
- Pictures: professional photos/school pictures. Just a few from each year to use for graduation display, etc.
- Sports: certificates, ribbons, articles as they get older
 Interview: I want to do an “All About Me” interview on their birthday, so I printed 18 of this version so they are all ready to be filled out each year.
- Age 0-3: artwork, projects from the early years, notes of funny things they said or did
- Age 4-5: preschool report card, special art projects, CD of pictures
- Kindergarten-Grade 12: report card, special projects or papers, etc. The goal is to limit it to only what FITS in the file.
- Blank: I added one extra file just for anything else that might pop up as a category according to their interests, like Music, 4-H, etc.

If you’re feeling really crafty, you can add a cute label to the front. I found it better to place them on the inside of the box and stick on with packing tape. Other ideas are to cut out vinyl if you have a Cricut or use paint-pen markers to just write on the front.

That’s it! For less than $20 and in just an hour or two, you can be ready to keep your kids organized for the next 18 years! This is also a much-appreciated baby gift!
It’s definitely worth putting together while your kids are young and you can modify it to fit your lifestyle. You can keep the files in a filing cabinet, add files as needed, purge things at the end of the year to keep only the most important things, etc. It’s just a system to get you started.
Be sure to PIN THIS blog post if this is something you want to come back to later!
Follow Working Mom Hacks on facebook for more tips!
BONUS: Save any of these label sets as an image, insert into a Word document and print! If you need to check sizes, each cell should be 2″ wide and 0.6″ tall.


Here is another blogger’s post with cute free printables: https://howdoesshe.com/free-printable-keepsake-box-labels/
Happy Organizing!

